
Category: How to
Getting started with WAMP: setting up
Memory exhausted problem
“Allowed memory size of 134217728 bytes exhausted”
I encountered this problem a few times, and setting memory_limit to a higher value didn’t seem to work
In php.ini:
memory_limit = -1;
Changing www root on WAMP
Open httpd.conf
Change
Listen 0.0.0.0:80
Listen [::0]:80
to
Listen 127.0.0.1:80
Listen [::1]:80
Change
DocumentRoot "C:/wamp/www/"
to
DocumentRoot "C:/Users/name/Sites/localhostwamp/"
Change
</pre>
<Directory "C:/wamp/www/">
<pre>
to
</pre>
<Directory "C:/Users/.../Sites/localhostwamp/">
<pre>
Setting mySQL password
go to shell (right click mysql shell in taskbar)
update mysql.user set Password = password('yourPasword') where User = 'root';
flush privileges;
go to phpmyadmin directory c:\…\wamp2.5\apps\phpmyadmin4.1.14\config.inc.php
replace:
$cfg['Servers'][$i]['auth_type'] = 'config';
$cfg['Servers'][$i]['user'] = 'root';
$cfg['Servers'][$i]['password'] = '';
with
$cfg['Servers'][$i]['auth_type'] = 'cookie';
$cfg['Servers'][$i]['user'] = '';
$cfg['Servers'][$i]['password'] = '';
Or watch this dummy video tutorial:
Set login session to something less restrictive for testing purposes
in your config.inc.php file (apps/phpmyadmin…)
$cfg['LoginCookieValidity'] = 604800; /* 1 week */
$cfg['MaxNavigationItems'] = 1000;
mysql error logging
add these lines to my.ini
log-queries-not-using-indexes
log-warnings
long_query_time = 2
log=C:/Webservers/wamp2/logs/querylog.log
log-slow-queries=C:/Webservers/wamp2/logs/SlowQueryLog.log
import sql-data into mySQL database
Right click Wamp icon in taskbar > mySQL
show databases;
use <databasename>;
source c:\Temp\queries.sql;
mysqldump in wamp (not via mysql console!)
Go to the wamp mysql directory via cmd prompt
cd c:\Webservers\wamp2\bin\mysql\mysql5.6.17\bin\
Now ‘all’ mysql commands are available:
mysqldump -u root -p dbname table1 table2 > output.sql
[SOLVED] XAMPP Row size too large, innoDB sql import
Ran into some problems recently with XAMPP. Exported a large mySQL production database and tried to import it locally in XAMPP (through Shell access).
Error: ERROR 1118 <42000> at line 437919: Row size too large <> 8126>. Changing some columns to TEXT or BLOB or using ROW_FORMAT=DYNAMIC or ROW_FORMAT=COMPRESSED may help. In current row format, BLOB prefix of 768 bytes is stored inline.
First I tried changing table to ROW_FORMAT=COMPRESSED doing so:
ALTER TABLE <tablename>
    ENGINE=InnoDB
    ROW_FORMAT=COMPRESSED
    KEY_BLOCK_SIZE=8;
No success with that. Then I changed innodb_buffer_pool_size to 32MB (default setting was 8 or 16) in my.ini (mySQL config file in XAMPP)

# Comment the following if you are using InnoDB tables
#skip-innodb
innodb_data_home_dir = "/Sites/xampp-portable-win32-1.8.3-5-VC11/mysql/data"
innodb_data_file_path = ibdata1:10M:autoextend
innodb_log_group_home_dir = "/Sites/xampp-portable-win32-1.8.3-5-VC11/mysql/data"
#innodb_log_arch_dir = "/Sites/xampp-portable-win32-1.8.3-5-VC11/mysql/data"
## You can set .._buffer_pool_size up to 50 - 80 %
## of RAM but beware of setting memory usage too high
innodb_buffer_pool_size = 32M
innodb_additional_mem_pool_size = 2M
## Set .._log_file_size to 25 % of buffer pool size
innodb_log_file_size = 10M
innodb_log_buffer_size = 32M
innodb_flush_log_at_trx_commit = 1
innodb_lock_wait_timeout = 50
innodb_file_per_table = 1
innodb_file_format = Barracuda
Doing so made it possible to import a 1GB sql table without any problem.
The above applies to XAMPP portable version xampp-portable-win32-5.5.19-0-VC11.zip
Winamp 5.666 change media library location
One of my previous posts guided you to the process of moving your library location from drive X to drive Y with the aid of a HEX-editor. This was tested for Winamp version 5.61. It was a rather complex approach, since iTunes XML import did not work in that version.
I have tested this again with Winamp version 5.666 and XML export/import works perfectly.
- Make a backup copy of your Winamp profile (c:\Users\<USERNAME>\AppData\Roaming\Winamp\*)
- Open Winamp
- Remove everything from your current playlist
- On the media library tab, click local library
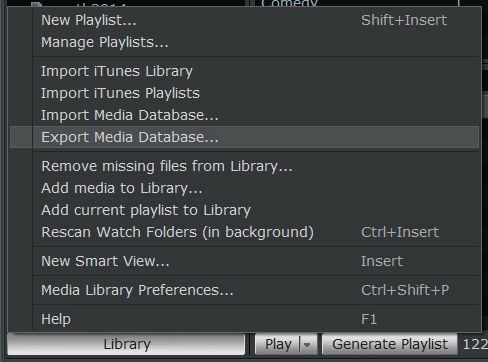
- Click Library button and export media database
Open the generated XML file, and with a program like notepad++, you can find & replace the <key>location</key> values to the new location. Save the file
- Reopen Winamp
- Remove everything in your library
- Close and reopen Winamp
- On the library button, choose import media database and point to the new XML file you created
That’s it!
Move your music library from Winamp to iTunes
In a previous post I helped you to switch your music library from iTunes to Winamp, without losing any metadata (such as last play date, play count, rating…). Now Winamp has stopped releasing new versions, some might want to switch back sooner or later. I’ve made the switch as a kind of experiment to see whether it would be possible to keep (the most valuable metadata). iTunes won’t be able to please me in the near future, but as time goes by, it might be the only easy way to sync with my old iPod Classic and iPad.
What do you need?
– Winamp 5.666 (media library required, standard Winamp installation)
– Your favorite txt notepad software with find/replace features (Notepad++, GVim, …)
– iTunes 11.2.2.3
It will please you to hear that moving the library back to iTunes is less complicated than the reverse option.
Steps
Start up Winamp
The default view has a button called ‘library’ at the bottom of the left column (media library column). Click, and choose ‘export media database’. This will create an iTunes XML library database.
Start up your favorite txt editor
Open the XML file created by Winamp in the previous step. Replace F below with the drive letter on your system. Find:
<key>Location</key><string>file://localhost/F:%5
Replace with
<key>Location</key><string>file://localhost/F:/
(so the only thing that needs replacement is %5 to /)
Save and close XML file
Start up iTunes
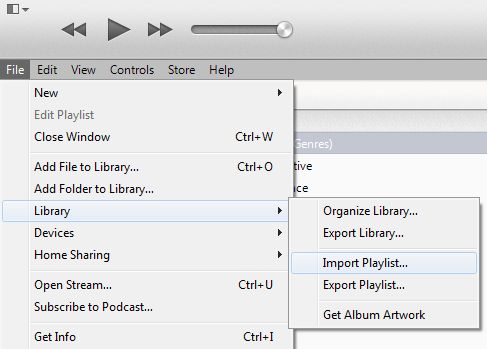
File (Alt + F) > Library > Import playlist… Choose the XML file
If you have lots of media files, this will take some time.
Record audio and video with VLC
Step by step tutorial on how to record audio and video with VLC. This will enable you to make a screencast without special software. This has been tested with VLC 2.0.8 and VLC 2.1.3.
Required to record audio/video
- http://www.videohelp.com/download/UScreenCapture2015.zip (http://www.videohelp.com/tools/UScreenCapture)
- http://sourceforge.net/projects/screencapturer/files/
Procedure:
- VLC > View > Advanced Controls
- VLC > View > Status Bar
- CTRL+C (open capture device)
- Screen capture record (video device)
- Virtual audio capture (audio device)
- If applicable: go to advanced settings and change 4:3 into, 16:9. You can change the default 4:3 aspecto ratio:
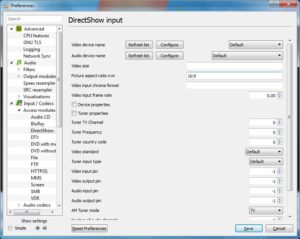
If you want to set the default picture-aspect ratio n:m to 16:9, go to advanced preferences (CTRL+P), show all settings, Input / codecs > DirectShow > Picture aspect ratio n:m, and change 4:3 to 16:9. - Next to play button, click arrow and choose “convert”
- Choose a destination filename, e.g. test.mp4
- Start recording…

Step by step tutorial adapted from:
VLC stuck in a loop? Kill process seems like the only solution?

Video image freezes, audio rewinds 3 to 4 seconds and gets stuck in a loop.
A similar problem has been documented here: https://trac.videolan.org/vlc/ticket/6600.
Unfortunately there seems to be no solution. It even happens in recent VLC distributions, like VLC Rincewind 2.1.3.
I have tried using Windows Media Player Classic (MPC), without any effect. At random intervals, with any kind of video format, video playback stops.
Quite out of the blue I found this behaviour tracing back to Intel Optimus Technology. I have two video cards: HD Graphics 4600 and NVIDIA Quadro K2100M controlled by Optimus. Optimus technology switches between these two GPU’s to ensure maximum battery autonomy.
When disabling Optimus in your BIOS settings, the video problem should belong to the past. This, however, isn’t an optimal solution when you rely on Optimus to get maximum battery autonomy. At this time, with the latest BIOS and Graphic drivers video playback keeps freezing with Optimus enabled. Hopefully, a driver update will fix this in the near future.
Feedback appreciated
WordPress Admin Running Slow? Here’s How To Fix It!
I update my WordPress Network quite often. Especially to prevent security issues. Load time for typical WordPress pages is as good as perfect. However, I discovered on some of my WordPress Network setups the wp-admin pages suddenly took forever to load. I was waiting 2 minutes to load any wp-admin page. After a long search I discovered the problem was a faulty db_version value in the wp_options table.
![]()
I usually auto update my sites and found out this value was not updated (or could not be updated automatically).
WordPress Codex pages (http://codex.wordpress.org/Version_3.6) list this value for every WordPress version. For example: Version 3.6 has database version 24448. Thus, you should update this value manually in your mySQL database: change db_version (option_name) in wp_options to 24448 (for version 3.6). You should repeat this for every site in your wordpress network (wp_2_options, wp_3_options, …).
It’s as ‘simple’ as that!
How to create a shortcut to a specific chrome user profile
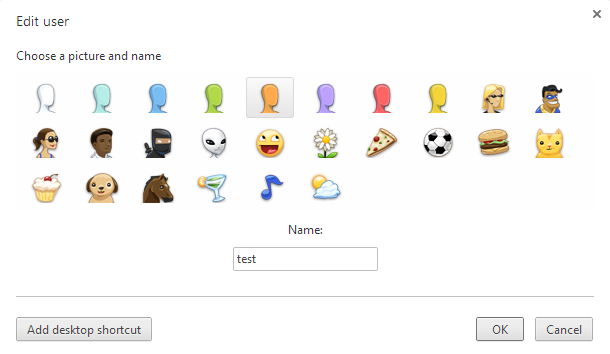
Method 1
- Go to settings
- The user list shows all user profiles, click on a user profile
- Click edit
- Add desktop shortcut button will now show up
Method 2
- Click on the user icon in the upper left corner of a Chrome instance.
- Go to the user profile for which you want to create a desktop shortcut, and click to open that Chrome instance.
- In the new Chrome instance click the icon again in the upper left corner. In the list with all user profiles go to the active user profile, and click ‘edit’. The ‘edit’ option only shows up for the active instance.
- In the pop-up window you now see a button “add desktop shortcut”.
See also:
Horrible! New profile switch design by @googlechrome. Extra click + terrible relocation #Chrome #UX http://t.co/5qI7l0Ni4D
— Jan Verkoyen (@JanVerkoyen) December 11, 2014
Afbeelding uitlijnen / positioneren in Microsoft Word 2010
Een afbeelding in een Word document toevoegen is kinderspel, maar meerdere afbeeldingen steeds op dezelfde plaats op één pagina houden (bijvoorbeeld verbonden met een bepaalde alinea) is wat anders. Vaak doet zich namelijk het probleem voor dat meerdere afbeeldingen in mekaar geschoven worden of plots allemaal bovenaan een pagina komen te staan.
De volgende stappen zorgen ervoor dat meerdere afbeeldingen steeds op de juiste positie blijft staan:
- Rechtsklik op een ingevoegde afbeelding
- Kies voor grootte en positie
- In tabblad positie kies bij onderdeel Horizontaal bijvoorbeeld uitlijnen “rechts” ten opzichte van “Marge”
- In hetzelfde tabblad kies bij onderdeel Verticaal voor absolute positie “0 cm” onder “alinea”
- In hetzelfde tabblad kies bij onderdeel Opties eventueel voor “Anker vergrendelen” zodat je niet per ongeluk achteraf de afbeelding verplaatst