Import Kaltura Capture Desktop Recorder files in Adobe Premiere CC

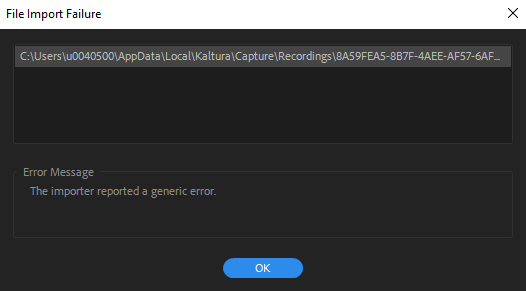
Last week I started working with the desktop/screen capture feature in Kaltura. Screen capturing is great with this tool but you’ll fall short when you want to go beyond simple edits/cuts. I like to do all my video editing in Adobe Premiere and you’ll notice when you import a Kaltura MP4 clip into Premiere, Adobe throws this error: “The importer reported a generic error.”

The solution is quite simple. You’ll have to change the extension of all your Kaltura .mp4 clips to .mts

With Total Commander you can batch rename a whole directory or a custom selection of files at once.

Best of luck with your stunning Premiere Productions!

Add a date to a JPG in Lightroom

If you import JPG files or other images in Lightroom which haven’t been captured by a camera or lost EXIF and other timestamp data, you can add a capture time this way:

  1. Go to grid view
  2. Select one or more image thumbs
  3. Choose Metadata > Edit capture time…
    (there is also the option to automatically use the date when the file was created)
Logo taken from Wikipedia (Public Domain)

What Adobe Illustrator can do with text

Adobe Illustrator has several type creation tools and options. You can type straight text, text along a curved line or shape, confine text to a pre-drawn shape, link text from one place to another, and change text into objects which can be distorted, filled, etc.

You often see text wrapped around a shape. Here is an overview of the various options Illustrator has to offer you.

Adobe Lightroom 4 tip: show filename in grid view

Normally in grid view only an index number is shown. When you hoover an image, you’ll see the filename and date taken/capture date. When selecting images based on filename this becomes a nightmare if you need to wait until the tooltip is showing.

Fortunately, there’s an option to show the filename in the grid view.

View > View options (ctrl + J) > tab Grid view “compact cell extras’ > check ‘Top label’ > choose copy name of file base name.

Audio noise reduction in Adobe Premiere Pro CS5

So you have bought ‘Adobe Premiere Pro CS5: classroom in a book’ and you are searching for a way to remove noise from an audio file? Your frustration might be skyrocketing when you find out on page 256 you need Adobe Soundboouth to do that and you don’t have an Adobe Master Collection license. Don’t despair, you won’t need Soundbooth to do that or any other third party software like Audacity .

Unfortunately, the book doesn’t mention this trivial solution for such a common problem.

Here’s how you can remove noise from an audio clip in Adobe Premiere itself. The benefit of this procedure is that it doesn’t change the audio-file in any way.

– Make sure you have an audio clip on your timeline
– In the effects panel (normally to the left of the timeline), look for ‘DeNoiser’ (Audio Effects 5.1 (or Audio Effects stereo / Audio Effects mono) > DeNoiser)
– Drag and drop this effect onto the audioclip in the timeline
– Double click the audio clip and it will be loaded into the source monitor (by default the ‘monitor’ to the left)
– Go to the effects control tab/panel: you will notice that the ‘DeNoiser’ has been added here)
– Play around with the settings (I prefer using the custom setting and set the Reduction button to -5Db or anything around that area). Start playing the video in the ‘program monitor’ and listen to the effect on the fly (while changing the settings to your liking)
Clipping Mask: a crop tool for Illustrator CS5

Looking for a crop tool in Illustrator CS5? Try a clipping mask instead! This way all your outside canvas drawings won’t be lost.

  1. Draw a rectangle above the area to be ‘cropped’
  2. Select all layers that need ‘cropping’
  3. Select Object > Clipping mask > Make

Still looking for cropping ways? Here are two examples:

Print directly from Adobe Illustrator (CS4+)

I’ve used these settings on a Lexmark X4650, but it will do fine on other printers too, if you want to make sure all measurements resemble on paper.

Lexmark print dialog

  • Check off ‘print last page first’ (when using artboards things can get tricky)
  • Choose print quality

Illustrator print dialog

  • Media size: A4 borderless (do not use borderless printing in the Lexmark print dialog, it uses a slight resize)
  • Do not scale (make sure you use correct size on design, artboards can be resized easily with the artboard tool Shift + O)