
With GuideGuide, it doesn’t have to be. Pixel accurate columns, rows, midpoints, and baselines can be created based on your document or marquee with the click of a button. Frequently used guide sets can be saved for repeat use. Grids can use multiple types of measurements. Best of all it’s free. Honestly, if you haven’t started downloading it by now, you’re probably a masochist. Weirdo…
Category: ICT
Informatie -en communicatietechnologie, (web)ontwikkeling, software, …
Straightening photos in Adobe Photoshop CS5
Two ways to straighten photos in Photoshop with ‘content aware fill’
Winamp, need to change your media library location?

Face it, your library location might change over time. When you’re using Winamp and don’t won’t to loose all valuable data like play count, last play date, … you probably searched around hours to find a solution on how to change the location to your media library (e.g. you swapped hard drives, bought a new pc, …). Rescanning your media folder is the easiest way to rebuild your media library, but you’ll loose play count, play dates and maybe more meta data.
I’ve searched the winamp forum for solutions, but the only result was people asking the same questions without getting the right answers. Depending on your Winamp version you might have tried some none working plugins too. The logical solution would be exporting your winamp media library to an iTunes XML format (and the export process will work!), but you’ll run into fatal errors when trying to import it. It all boils down to getting access to the core data file of your winamp media library (main.dat) and updating an outdated location to a hard drive or directory that has been moved. Continue reading “Winamp, need to change your media library location?”
(y) 4 Firefox 4

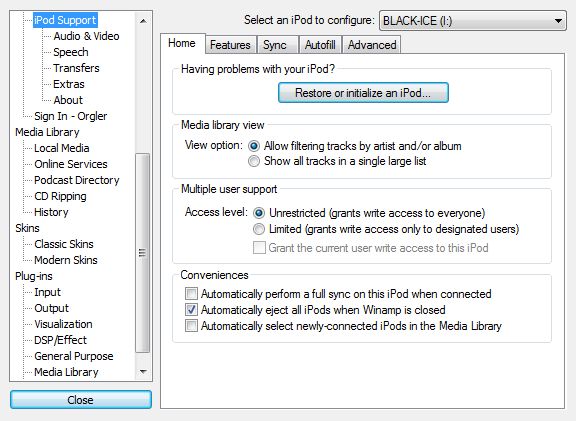
Extending iPod support in WinAmp
This article is a continuation of ‘Moving your music library from iTunes to Winamp’
The standard distribution of Winamp already comes with basic functionalities for connecting iPod/iPhone devices. However, these features are really basic! Album art, smart playlists and ratings are not transferred.
The plugin ‘ml_ipod‘ enables such features (installation and configuration are self-explanatory). Compatibility should be checked with your device at the ml_ipod website, since Apple is not very happy with third party software.
Moving your music library from iTunes to Winamp.
It took me a long while to find a decent alternative for iTunes. First of all I wanted to get rid of Quicktime. It’s a player that really likes to hijack file associations. Still, I managed to live with that. Unfortunately the iTunes software keeps getting bigger with no benefit whatsoever. In my case I just need a mediaplayer (music player) for Windows that manages a music library and makes it easy to synchronize with my iPod Classic. I don’t need any other software stuffed down my throat containing drivers, connectors, features, ads,… for Apple hardware which I’m not planning to buy!
Moving from one player to another would be very easy if you hadn’t been upgrading like a good citizen into one of the latest iTunes releases where you followed the candytrail into the sealed fortress. Continue reading “Moving your music library from iTunes to Winamp.”
WordPress: installatie, beveiliging, upgrades
(update augustus 2013)
WordPress installeren en beveiligen
- WordPress wp-admin dir extra beveiligen met .htaccess
- Update august 2013 admin ajax issue/fix
In .htaccess below /wp-admin/ add this:<Files admin-ajax.php> Order allow,deny Allow from all Satisfy any </Files>
- Update august 2013 admin ajax issue/fix
- WordPress secret keys definiëren in config.php via https://api.wordpress.org/secret-key/1.1/
- Zorg dat alleen de webserver (apache) aan config.php kan (750 ipv 755 !)
WordPress gehacked?
WordPress plugins manueel upgraden?
- Plugin deactiveren in beheer
- Plugin map verwijderen van de server
- Nieuwe Plugin uploaden
- Plugin terug activeren: plugin detecteert zelf of database-aanpassingen nodig zijn
Nuttige plugins
- nextgen photo gallery
wp-spamfree(gebruik Akismet, standaard opgenomen in WordPress)- SI CAPTCHA Anti-Spam
- syntax highlighter evolved: klik hier voor ondersteunde talen
- WP-RSSImport: importeer RSS feeds in blog posts / pages
Smart Youtube(overbodig, WordPress ondersteunt dit automatisch via oEmbed)
Enter Songbird, Exit iTunes of eerder WinAmp of MediaMonkey?

Het ging niet lang meer duren, zo bleek al uit een van mijn vorige berichten. Ik heb iTunes nu definitief naar de prullenbak verwezen en Songbird geïnstalleerd. Wat een verademing, of toch niet helemaal?? Continue reading “Enter Songbird, Exit iTunes of eerder WinAmp of MediaMonkey?”