[SOLVED] XAMPP Row size too large, innoDB sql import

Ran into some problems recently with XAMPP. Exported a large mySQL production database and tried to import it locally in XAMPP (through Shell access).

Error: ERROR 1118 <42000> at line 437919: Row size too large <> 8126>. Changing some columns to TEXT or BLOB or using ROW_FORMAT=DYNAMIC or ROW_FORMAT=COMPRESSED may help. In current row format, BLOB prefix of 768 bytes is stored inline.

First I tried changing table to ROW_FORMAT=COMPRESSED doing so:

ALTER TABLE <tablename>
    ENGINE=InnoDB
    ROW_FORMAT=COMPRESSED
    KEY_BLOCK_SIZE=8;

No success with that. Then I changed innodb_buffer_pool_size to 32MB (default setting was 8 or 16) in my.ini (mySQL config file in XAMPP)
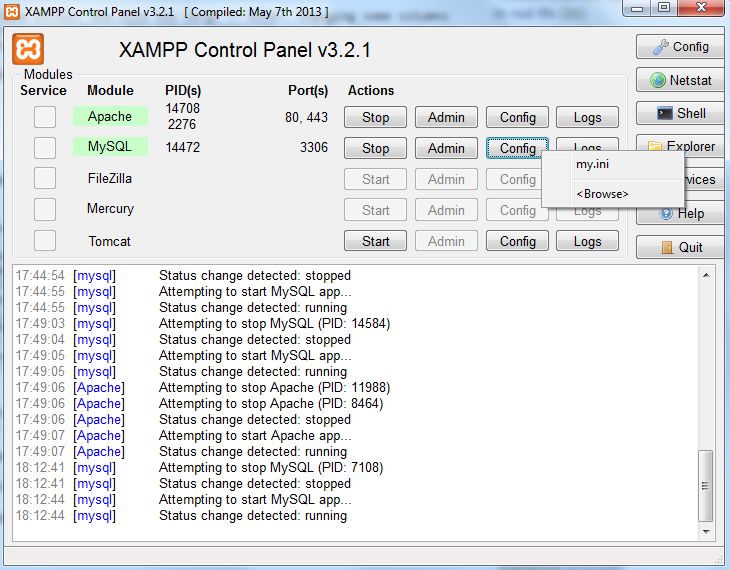
xampp control panel

# Comment the following if you are using InnoDB tables
#skip-innodb
innodb_data_home_dir = "/Sites/xampp-portable-win32-1.8.3-5-VC11/mysql/data"
innodb_data_file_path = ibdata1:10M:autoextend
innodb_log_group_home_dir = "/Sites/xampp-portable-win32-1.8.3-5-VC11/mysql/data"
#innodb_log_arch_dir = "/Sites/xampp-portable-win32-1.8.3-5-VC11/mysql/data"
## You can set .._buffer_pool_size up to 50 - 80 %
## of RAM but beware of setting memory usage too high
innodb_buffer_pool_size = 32M
innodb_additional_mem_pool_size = 2M
## Set .._log_file_size to 25 % of buffer pool size
innodb_log_file_size = 10M
innodb_log_buffer_size = 32M
innodb_flush_log_at_trx_commit = 1
innodb_lock_wait_timeout = 50
innodb_file_per_table = 1
innodb_file_format = Barracuda

Doing so made it possible to import a 1GB sql table without any problem.

The above applies to XAMPP portable version xampp-portable-win32-5.5.19-0-VC11.zip


Enable Apache Error Logging for Mod_Rewrite in Xampp

Mod_Rewrite enables you to do fancy stuff with URLs, but it isn’t always transparent when it comes to debugging. In a development environment it can be useful to enable apache error logging to see where a mod_rewrite line fails.

In XAMPP you can do this by opening httpd.conf (open control panel > config > Apache (httpd.conf)) and append mod_rewrite.c:trace3 to LogLevel.

LogLevel warn mod_rewrite.c:trace3

How to import large sql files in XAMPP?

XAMPP is a very easy to use local webserver. Can be slow sometimes, but hey! it’s for testing purposes.

Ever tried to import a large SQL file? Doing so with phpMyAdmin will cause you headaches when tweaking php.ini to accept large data sets: memory_limit, post_max_size, etc…

Ever considered using the shell option? Once you have started your Apache and mySql module in the control panel, click “Shell”.

A command prompt will open and all you need to do is use this command line:

mysql -u root -p <DB_NAME> < <location of your large sql file

Example:

mysql -u root -p test < "d:\sql exports\file.sql"

Use -v to output the import process to screen

mysql -u root -p -v test < "d:\sql exports\file.sql"

Alternative method (no quotations in source command location!)

mysql -u root -p;
use <db-name>;
source C:\Temp\filename.sql;

SQL indexes

Disable indexes before you start importing, re-enable them when completed.

ALTER TABLE `table_name` DISABLE KEYS;
ALTER TABLE `table_name` ENABLE KEYS;

Further reading: https://support.tigertech.net/mysql-large-inserts

ERROR 2006 (HY000) at line 9999: MySQL server has gone away

It’s possible that this error occurs in XAMPP. It’s easily resolved by changing

  • my.ini at “\xampp\mysql\bin\”.
  • change “max_allowed_packet” to a higher value than the default 1M. E.g. 10 MB
  • restart mysql service

Flush buffers

(post was updated on 2014/07/31)

Sometimes you want to output HTML to the browser before a script has finished completely. In some browsers it takes a while before ‘some’ content is displayed. Flush buffers can help to actively force output to be shown.

A combination of PHP functions is useful to please all kinds of browsers. However the code below might no longer work in recent Apache/PHP environments. Still works locally on XAMPP

function flush_buffers(){
	ob_end_flush();
	ob_flush();
	flush();
	ob_start();
}

You should read http://stackoverflow.com/questions/4870697/php-flush-that-works-even-in-nginx. Maybe these adjustments will help you to implement the PHP flush functions.

Test code

ob_implicit_flush(1);
for($i=0; $i<10; $i++){
    echo $i;
    //this is for the buffer achieve the minimum size in order to flush data
    echo str_repeat(' ',1024*64);
    sleep(1);
}

Aan de slag met Mercury mail voor XAMPP

Om lokaal wat programmeerwerk als voorbereiding op een live omgeving te verrichten, is XAMPP de ideale omgeving. XAMPP komt pas echt tot zijn recht met de opstelling van een eigen mailserver (Mercury Mail) waarmee je lokaal het verzenden van mails kan testen.

De uitgebreide versie van XAMPP bevat zo’n SMTP service. Bij een eerste kennismaking word je overstelpt door een hele reeks vensters die kris kras op het scherm staan. Om hierin wat wegwijs te raken, is er een uitstekende videotutorial op YouTube:

Een van de belangrijkste zaken die je moet weten bij dit programma is dat voor quasi elke aanpassing het programma opnieuw moet opstarten omdat Mercury Mail in XAMPP geen service is!

De basisinstellingen

  • Configuration: volgende protocul modules aanvinken:
    • Mercury S SMTP server
    • Mercury P POP3 server
    • Mercury E, SMTP end to end client delivery client
    • Mercury D Distributing POP3 client,
    • Mercury I Iamp4 server
  • Configuration
    • Core module
    • Local domains > add local domain
      • Localhost
      • mydomain.com
  • Configuration
    • Mercury S
    • Connection control
    • Uncheck “do not permit SMTP relaying of non-local mail”
  • Configuration
    • Mercury E
    • DNS Servers (open DNS): 208.67.222.222,208.67.220.220
  • Configuration
    • Manage local users: een testgebruik definiëren
      Het is best dat je geen gebruik maakt van postmaster@localhost, omdat deze standaard alle foutberichten opvangt.
    • Username: root
      Personal name: root
      Password: pass

Het enige wat je nu nog moet doen is de configuratie van deze local mail account in je favoriete e-mailprogramma. Daarin volg je dezelfde werkwijze alsof je een remote mailserver zou aanspreken, maar bij de serversettings plaats je gewoon ‘localhost’.

De vooraf gedefinieerde accounts hebben volgende paswoorden:

  • Postmaster: Postmaster (postmaster@localhost)
  • Administrator: Admin (admin@localhost)

User: newuser
Password: wampp