HP USB-C audio problems / no audio devices…

Are you losing all your audio-devices when connecting a USB C dock to your laptop, or a USB C monitor (with a USB hub)?

Try disconnecting all audio devices (including webcams with microphones) from the HP Dock or HP monitor.

After a while audio output from your laptop will be available again.

Still trying to figure out how to get audio working from the USB C dock and USB C monitor…

If you try troubleshooting the “no audio devices available”, audio services will restart but just for an instance. They will disappear quite immediately…

Update: Fix can be found here, and seems to be (at least also) related to a Logitech C920 webcam.

Device manager > Disable HD pro webcam C920 (only under sound, video and game controllers). Wait 30 seconds and audio devices will reappear.
Record audio and video with VLC

Step by step tutorial on how to record audio and video with VLC. This will enable you to make a screencast without special software. This has been tested with VLC 2.0.8 and VLC 2.1.3.

Required to record audio/video

  • http://www.videohelp.com/download/UScreenCapture2015.zip (http://www.videohelp.com/tools/UScreenCapture)
  • http://sourceforge.net/projects/screencapturer/files/

Procedure:

  • VLC > View > Advanced Controls
  • VLC > View > Status Bar
  • CTRL+C (open capture device)
  • Screen capture record (video device)
  • Virtual audio capture (audio device)
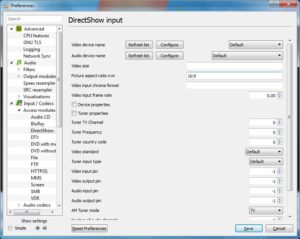
  • If applicable: go to advanced settings and change 4:3 into, 16:9. You can change the default 4:3 aspecto ratio:

    change default picture aspect ratio in vlc
    If you want to set the default picture-aspect ratio n:m to 16:9, go to advanced preferences (CTRL+P), show all settings, Input / codecs > DirectShow > Picture aspect ratio n:m, and change 4:3 to 16:9.
  • Next to play button, click arrow and choose “convert”
  • Choose a destination filename, e.g. test.mp4
  • Start recording…


Step by step tutorial adapted from:

VLC stuck in a loop? Kill process seems like the only solution?

Video image freezes, audio rewinds 3 to 4 seconds and gets stuck in a loop.
A similar problem has been documented here: https://trac.videolan.org/vlc/ticket/6600.
Unfortunately there seems to be no solution. It even happens in recent VLC distributions, like VLC Rincewind 2.1.3.

I have tried using Windows Media Player Classic (MPC), without any effect. At random intervals, with any kind of video format, video playback stops.

Quite out of the blue I found this behaviour tracing back to Intel Optimus Technology. I have two video cards: HD Graphics 4600 and NVIDIA Quadro K2100M controlled by Optimus. Optimus technology switches between these two GPU’s to ensure maximum battery autonomy.

When disabling Optimus in your BIOS settings, the video problem should belong to the past. This, however, isn’t an optimal solution when you rely on Optimus to get maximum battery autonomy. At this time, with the latest BIOS and Graphic drivers video playback keeps freezing with Optimus enabled. Hopefully, a driver update will fix this in the near future.

Feedback appreciated

Audio noise reduction in Adobe Premiere Pro CS5

So you have bought ‘Adobe Premiere Pro CS5: classroom in a book’ and you are searching for a way to remove noise from an audio file? Your frustration might be skyrocketing when you find out on page 256 you need Adobe Soundboouth to do that and you don’t have an Adobe Master Collection license. Don’t despair, you won’t need Soundbooth to do that or any other third party software like Audacity .

Unfortunately, the book doesn’t mention this trivial solution for such a common problem.

Here’s how you can remove noise from an audio clip in Adobe Premiere itself. The benefit of this procedure is that it doesn’t change the audio-file in any way.

– Make sure you have an audio clip on your timeline
– In the effects panel (normally to the left of the timeline), look for ‘DeNoiser’ (Audio Effects 5.1 (or Audio Effects stereo / Audio Effects mono) > DeNoiser)
– Drag and drop this effect onto the audioclip in the timeline
– Double click the audio clip and it will be loaded into the source monitor (by default the ‘monitor’ to the left)
– Go to the effects control tab/panel: you will notice that the ‘DeNoiser’ has been added here)
– Play around with the settings (I prefer using the custom setting and set the Reduction button to -5Db or anything around that area). Start playing the video in the ‘program monitor’ and listen to the effect on the fly (while changing the settings to your liking)